McAfee AVERT Stinger is a stand-alone utility used to detect and remove
specific viruses. It is not a substitute for full anti-virus protection,
but rather a tool to assist administrators and users when dealing with
an infected system. Stinger utilizes next generation scan engine
technology, including process scanning, digitally signed DAT files, and
scan performance optimizations.
Windows ME/XP/Vista users:
Disabling System Restore
Windows utilizes a restore utility that backs up selected files
automatically to the C:_Restore folder. This means that an infected file
could be stored there as a backup file, and VirusScan will be unable to
delete these files. You must disable the System Restore Utility to
remove the infected files from the C:_Restore folder.
Disabling System Restore
Windows utilizes a restore utility that backs up selected files
automatically to the C:\_Restore folder. This means that an infected file could
be stored there as a backup file, and VirusScan will be unable to delete these
files. You must disable the System Restore Utility to remove the infected files
from the C:\_Restore folder.
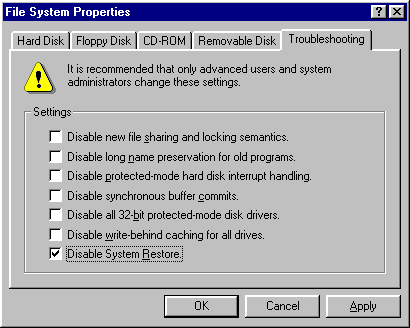
Windows ME
1. Right-click the
My Computer icon on the Desktop and click
Properties.
2. Click the
Performance tab.
3. Click the
File System button.
4. Click the
Troubleshooting tab.
5. Put a check mark next to
Disable System Restore.
6. Click
OK.
7. Click
Yes when prompted to restart.
Note: To re-enable the System Restore Utility, follow
the steps above, but remove the check mark next to
Disable System Restore.
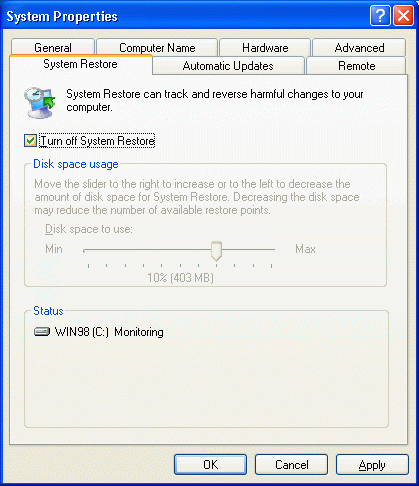
Windows XP
Disabling the System Restore Utility (Windows XP Users)
1. Right-click the
My Computer icon on the Desktop and click
Properties.
2. Click the
System Restore tab.
3. Put a check mark next to
Turn off System Restore on All Drives.
4. Click
OK.
5. Click
Yes when prompted to restart.
Note: To re-enable the System Restore Utility, follow
the steps above, but remove the check mark next to
Turn off System Restore on All Drives.
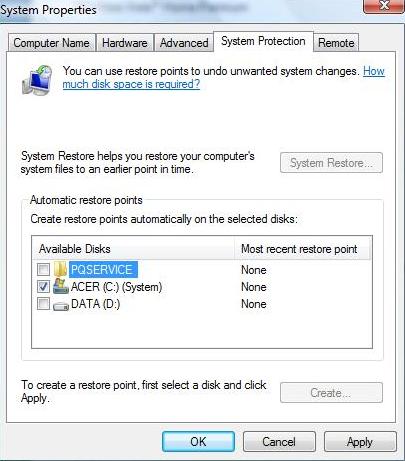
Windows Vista
1. Click the
Start button.
2. Click
Control Panel.
3. Click
System and Maintenance.
4. Click
System.
5. In the left pane, click
System Protection. If prompted, enter your Administrator password
or click
Continue.
6. Uncheck the box next to the disk on which you wish to disable System Restore.
7. Click
OK.
Note: Disabling System Protection will
delete all existing restore points. To re-enable the System Restore Utility, follow the steps above,
but check the box next to the disk on which you wish to enable System Restore.
Homepage


